


![The sights of Avalon Air Show 2025: Day Three [PHOTOS]](https://breakingdefense.com/wp-content/uploads/sites/3/2025/03/f-35-avalon-final-day-scaled-e1743079275404.jpg?#)


.jpg)

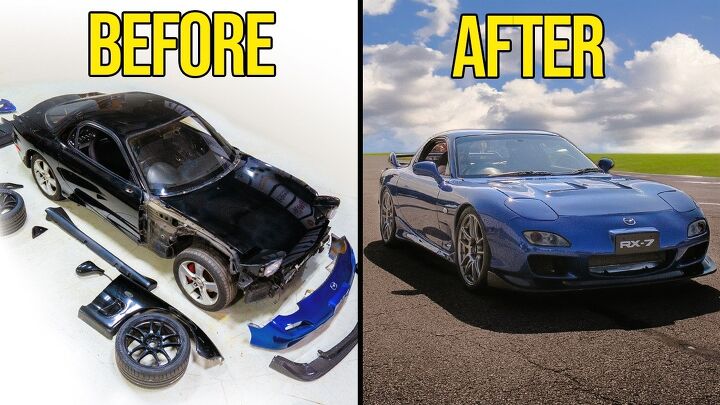
Rebuilding A Wreck Into A Ripping Mazda RX-7
It all started with a bad decision—or so we thought. We picked up a right-hand drive Mazda RX-7 in rough shape. The paint was garbage, the engine was blown, and the interior had seen better days. But what looked like a lost cause turned into one of our proudest builds to date.

It all started with a bad decision—or so we thought. We picked up a right-hand drive Mazda RX-7 in rough shape. The paint was garbage, the engine was blown, and the interior had seen better days. But what looked like a lost cause turned into one of our proudest builds to date.
If you're wondering how to bring a battered Mazda RX-7 back from the brink, you're in the right place. In this video, the guys from TTAC Creator Speed Academy work their magic on this rough RHD RX-7.
Speed Academy is a website and YouTube channel based on making things go fast and enjoying cars. Peter Tarach and Dave Pratte are the forces behind Speed Academy.
The TTAC Creators Series tells stories and amplifies creators from all corners of the car world, including culture, dealerships, collections, modified builds and more.
Tools & Materials
- TurboSource twin-scroll manifold
- BorgWarner EFR 7670 turbo
- Core Components ignition kit
- Greddy V-mount intercooler system
- Vibrant intake piping
- Greddy PE-TR exhaust system
- JP3 Motorsports battery tray
- Valvoline break-in oil
- Radium fuel filter
- ST Suspension components
- Konig Heliogram wheels
- Continental ExtremeContact Sport tires
- OEM and aftermarket interior trim pieces
- Anaerobic sealant
- 20W-50 VR-1 full synthetic oil
Step 1: Prepping the Mazda RX-7 for Paint
Our journey began with a tired-looking shell. The paint was chipped, dull, and downright embarrassing. We stripped it down to the essentials—nothing too extreme, but enough to get clean access for the paintwork. And no, we didn’t go black. We went with a bold, fresh color that finally gave the Mazda RX-7 the visual respect it deserved.
Step 2: Engine Rebuild and Turbo Setup
The factory engine was toast. We pulled it and rebuilt a 13B with a more responsive single turbo setup using a TurboSource manifold and an internally gated EFR 7670. While installing, we realized space constraints would be an issue, so off came the turbo to make room for engine placement.
Step 3: Fuel, Ignition & Cooling Systems
We didn’t cut corners here. We installed a Core Components ignition system with smart coils and swapped the inadequate stock fuel filter for a Radium microglass unit. The V-mount intercooler setup required a new bracket (since we weren’t running AC), and we swapped out the power steering cooling line for a more airflow-friendly setup.
Step 4: Exhaust, Intake, and Battery Placement
The exhaust was a bit of a patchwork: a new Greddy PE-TR muffler, a used mid-pipe (yes, someone forgot to order one), and a custom-fabbed downpipe. The intake? A clean Vibrant 3.5-inch setup with a perfect fit around the engine bay, thanks to smart design choices and solid part selection.
Step 5: Solving Leaks and Final Engine Prep
What’s a rotary build without a leak? We found coolant pouring from behind the flywheel—thanks to a missing seal behind one of the ARP tension studs. After sealing it with anaerobic sealant and reassembling the drivetrain, we finally had a leak-free engine ready for fluids and break-in.
Step 6: Suspension and Wheels
Off came the sad Mazda3 wheels. In their place: Konig Heliograms wrapped in Continental ExtremeContact Sport tires. With new ST Suspension components, a street/track alignment, and a five-mil front spacer for balance, the car finally looked and handled like it should.
Step 7: Mazda RX-7 Interior Rehab
The interior was brittle and tired. We outsourced key pieces to a specialist and then reassembled the whole cabin. With stock seats and wheel intact, it kept that authentic feel—though headroom remains a challenge for the, let’s say, non-JDM-sized among us.
Step 8: Final Touches and Dyno Results
We upgraded fender liners and undertrays with 99-spec parts and buttoned everything up. On the dyno, the Mazda RX-7 put down 370 wheel horsepower at ~13.7 PSI. That’s strong, safe power on this setup—and best of all, it drives great.
Conclusion: How to Rebuild a Mazda RX-7 the Right Way
This Mazda RX-7 started as a disaster, but with smart part choices, a lot of patience, and a fair amount of problem-solving, it turned into one of our cleanest builds yet. Whether you're tackling paint, turbo installs, or interior rehab, there's no shortcut—just good planning and great execution. We’re proud of this one, and hope it inspires your next Mazda RX-7 project.
Got a project car nightmare story—or success? Drop it in the comments or share your rebuild photos. We’d love to see them.
This article was co-written using AI and was then edited and optimized by our editorial team.
FULL TRANSCRIPT
FULL BUILD - REBUILDING THE WORST FD MAZDA RX-7
0:00:00 Speaker 2
We bought this right -hand drive FD RX -7 thinking it was a deal but not only was the paint completely trash but so was the engine. So join us on this journey as we rebuild this RX -7 from zero to hero.
00:00:19 Speaker 2
she's dusty she's a little bit battered and she doesn't match and you will have actually seen this car once before on our channel we did a single episode on it where we pulled the engine out because the engine in this thing was blown and we did a full rebuild of it for now we just want to prep it to go to paint because the paint on this thing is trashed well the scope creep has begun everyone because popping the hood and having a look around in the engine bay the car is going
00:00:48 Speaker 2
The paint's kind of like chipped off in places. It's just not looking very fresh in here and it's gonna look kind of weird to have fresh paint on the body and not in the edge of it.
00:01:14 Speaker 2
There we have it stripped down as best as we could within reason we didn't want to go too crazy But we think we've got enough stuff out of the way to let Ritchie do his work. Here we go. Everybody Let's pull some plastic off it. I think you know what color it is even with plastic on but We did it TP! We didn't go black! Look at that!
00:02:01 Speaker 2
back at the shop and yes we did have to put that front lip on because it just looked so incomplete without it. Oh it looks so much better now. Man I feel better already just seeing how good that looks.
00:02:29 Speaker 2
That's right, guys. It's time to get down to work on our FDR -X7. And man, am I ever excited about this one. And as you can see, we've got a whole bunch of tasty parts here. So I think it's time to get down to some work.
00:03:10 Speaker 2
And as you can see with the turbo setup, we are using TurboSource's Investment Cast Manifold, which is a twin -scroll manifold, really beautiful design, designed specifically to work with these twin -scroll EFR turbochargers, and we are using their internally gated turbocharger. However, we are going to remove all of this stuff now because we've come to the realization that it's going to be easier to install the engine without the turbo on it, and there's just a lot of stuff space constraints in a relatively small car and relatively small engine bay. So this is gonna come off now and then we'll get to work to putting that engine in the bay.
00:04:07 Speaker 2
Can I just say, look at the size of this engine. Isn't it amazing? From that aspect, this is the greatest engine ever built when you can fit it into an engine bay like this. Yeah, it's barely bigger than the transmission. Yeah, it's incredible.
00:04:54 Speaker 2
Oh, progress has happened, holy smokes. This engine comes together so easily when you've got so much space to work. I am tightening the belt here that has this full function engineering pulley. And that is because we've deleted the air pump that goes here because we've got the single turbo set up. You saw me bolt that up as well. By the way, for those of you that haven't been following along, this is a 7670. EFR so it's a smaller size turbo for this engine. I know some of you are gonna say it's choking it out It's not gonna make all the horsepowers, but we don't want that. We want a high -response Setup now that Pete's got the fuel system wrapped up We are moving on to the ignition system and for that we have turned to core components who make this really slick setup Including this aluminum mounting bracket that puts these four a .m Smart coils down on the frame rail here. It's a really nice spot for it And I think a very nicely designed bracket comes with excellent instructions. As you
00:05:50 Speaker 2
can see, we've moved on to removing the power steering cooling line here, which we don't want anymore because we're going to be going to a V -mount front mount intercooler and radiator setup. And this is going to be in the way of that airflow. And in its place is this amazingly compact little heat exchanger. All right. Just tightening down the last and fitting here on this core components cooler. And as you can see, it's a remarkably simple setup.
00:06:31 Speaker 2
This is a V -mount kit from them. They're a standard 19 or type 19 standard kit. And I love it because as you guys just saw, everything bolts together. And it is one of the few kits that has a lot of ducting, which I think is critical on FD. We did, however, have to build this little bracket as you guys just saw. And that was because there's supposed to be a condenser that goes here. Believe it or not, a condenser can go in here. You can still retain AC with this. We don't have it. So we did have to just like close this off right here. So here is our intake. And as you can see, it was actually very, very simple. We had a 45 degree bend and this coupler all three and a half inch from Vibrant. And look at this, man. Here's another reason why we went with the whole Greddy system. Like look how nicely that fits up in this area right here.
00:07:52 Speaker 2
There you have it our exhaust system is complete and it is a bit of a mishmash As you guys saw we did install this trust Greddy PE -TR, you might as well call it a Peter exhaust DP here. And this, this is a used mid pipe. And why do we have a used mid pipe? Well, someone may have forgotten to order a mid pipe. That's right. So we quickly found this one online and scooped it up locally. And truth be told, I'm actually happy with it. It's got a big Magnafo resonator in it. So this is certainly gonna quiet this car down quite a bit. for the downpipe we didn't have one that came with the turbo kit so we decided to fab up our own. Jumping back into the engine bay and we are going to install a battery tray from JP3 Motorsports. This allows you to use a very compact PC680 sized battery in the stock location. Well we've got that JP3 kit in place now and we do move the intercooler over there a couple of inches with the brackets that they supply. It does make the filter over here quite tight, but
00:09:00 Speaker 2
it does still fit. So that is a bonus. And as for the rest of it, it's all in place here. So we're now just waiting for that battage to arrive and we'll be done with that setup.
00:09:42 Speaker 2
After doing a bunch of research, we have figured out that the factory fuel filter, which is in the rear, is not adequate enough for a filtration standpoint for a tuned rotary engine. So what we have done is we have upgraded to a radium fuel filter. This is their micro glass, like five, I think, micron fuel filter. So this is their highest point of filtration, which should be adequate for what we are going to do. Fuel system wrapped up.
00:10:12 Speaker 2
This is the right choice for a single turbo 13B like we're running. But if you want to run the sequential turbos, then you need to go to their 2500. Exciting times here, guys. We are finally at the point where we're putting fluid in this motors, which means we are getting close to firing it up. And for break -in, we've just thrown in some of Valvoline's conventional daily protection, non -synthetic motor oil, Jowar engine builder. And I think really pretty much any rotary engine builder recommends breaking these motors in on a non -synthetic.
00:10:55 Speaker 2
All the fluids are in and we are ready for a first start. At least we were until I noticed this, the dreaded coolant leak. We've looked all the way around and it's not coming from the top or the side of the engine. It's coming from behind the flywheel people. So guess what that means? We now have to take the gearbox and everything else apart.
00:11:34 Speaker 2
And we do have our culprit where coolant is leaking. You can see everywhere, like if you look up here, there from this stud here, there is coolant, there is coolant all the way around here. And essentially what is happening is these tension rods, which are the studs, which are the equivalent of like head studs, have these little washers on them that have, rubber seal that are supposed to seal the coolant. These are just a little bit bigger in diameter than the ARP studs. We just did check Elliot's from Turbosource's website who has an install procedure on theirs and he does say to put some silicone behind these. We are down to the last stud here and if you look up there is a lot of blue. It is an anaerobic sealer. and this is apparently what you want to use for a job such as this. So Dave just came up with a brilliant idea of why not fill the cooling system right now and then we can 100 % certainty know that we don't have a leak in the back and that's exactly what we're going to do. So
00:12:42 Speaker 2
it looks like we are good. As you can see, no leaking of the coolant here. And just like that, we are back to where we started only about a day later. As you can see, our freshly built 13B is pretty much ready to party, but we are waiting for a base map before we can do first startup. And that means we've got some time to kill here, PT. And as a result, we are going to just finish everything else on here, starting with the suspension. So let's get this car up in the air and take off these horrible old Mazda three wheels and get all this old suspension junk out of there.
00:14:59 Speaker 2
favorite part and probably your favorite part of any build and that is of course the wheel and tire package and can I just say that these new Konig Heliograms are quite possibly the nicest flow -formed wheel Konig has ever made. I think they're absolutely beautiful and of course we've wrapped them in our favorite tire. This is the Continental Extreme Contact Sport and this is the summer tire of choice here at Speed Academy because it is extremely good in the summer. in every condition you can throw at it in a three -season environment basically you could say as far as specs go we've gone with a 255 35 18 all around however we do have a staggered wheel setup so this is the rear wheel in a 18 by nine and a half plus 35 and the front is an 18 by eight and a half plus 42 and as we've discovered we probably could have gone a little more aggressive in the front had we rolled the fenders and maybe trimmed the rear fenders before it went off to body and paint but we've done it again pt we forgot
00:15:49 Speaker 2
to do that before it went to body and paint so we went a little conservative and offset just to make sure we would fit without rubbing and I think you'll agree when you see these on the car that they are going to look really really good. Just wrapping up the alignment here and as you can see we've gone with a kind of a mild street slash track alignment on it two and a half degrees in the front two two in the rear big win and man this car is looking mega good now so let's get it on the ground and shoot the beauties.
00:16:47 Speaker 2
There you have it guys. What do you think? I am very pleased the way this thing is turning out. I think it looks amazing with this color combination. And we did put in a ST suspension, five mil spacer on the front to bring the offset of the wheel out so that it visually lines up better with the rear offset. And I think right now we do have a really nice balanced look. Exciting times here. We are just about ready to start this FD up.
00:18:09 Speaker 2
Well, there is some serious bad news here. Nothing catastrophic, but we have a major oil leak, as you can see right here, so between the block and the oil pan. And at first I thought the oil pan wasn't sealed properly, but after talking to Joe, our engine builder, He mentioned that these irons were nitride coated. And in order to do that, they had to like strip out all of like these little plugs that go into a lot of the irons. When they do that, what they do is they put threads into it and then you can screw, you know, countersink plugs into them. And likely what has happened is there is no plug in here, which is why it is gushing at such an alarming rate. Well guys, I do apologize. In the rush to get this done, we didn't actually shoot any footage showing what the issue was, but it in fact was the plug for one of the oil ports was missing. See, we did drop the entire subframe down. It wasn't... Too bad a job, I thought it was gonna be way, way worse, but we were able to just hold the
00:19:18 Speaker 2
engine up and then just drop the subframe, and here we are three hours later putting it all back together. With the mechanical side of this car essentially complete, man, what a feat and battle that was, we are moving on to the interior. And much like the engine side of things, the interior on Mazdas and FDs in general is just a bit of a nightmare too. The plastics break, they're hard to get, like people buy entire cars to get full interiors. I sent this off to a fellow Canadian, Michael Gagne, and he ended up fixing this thing and works perfectly now. So at this point, I think what we're going to do is just slap this interior together and show you our finished product. There you have it. Interior is back together. Only took me like three or four hours, of course. And I must say it is looking awfully nice in here. And I really do like the stock steering wheel and the stock seats very comfortable. You don't really need a racing bucket in here. other than the fact that I just don't have a
00:20:15 Speaker 2
lot of headroom. And if I'm honest, for heel and toeing, my knee is kind of hitting the steering wheel, but... You weren't built for an FD, JP. I'm a little girthy for this car, for sure. I'm not JDM size.
00:20:52 Speaker 2
Well, that was a quick way to spend about $600 here. We did do new fender liners, and we did do the under tray here with these 99 spec ducts. And as you can see, really what it does is it ties everything together. It certainly gives stiffness and rigidity to the front bumper. We're big fans of that. And of course, now we have proper ducting for the air to pull out through the V -mount. Although I do wonder, there's a ton of like small holes here. There's these little guys here. of vents here and that's about it. You'll notice this area right here, it's certainly complicated and things are going on. Look at the difference, look how much cleaner that looks. That is absolutely incredible. Of course, it is built out for the Greddy V -Mount kit and you know, the small battery and all that, but wow, like what a transformation. All right guys, now that the engine bay is wrapped up and looking magnificent, it is time to prep this thing to go to the dyno and that means putting in the good stuff
00:21:50 Speaker 2
the VR -1 full synthetic in a 20W -50 weight. That's what Joe, our engine builder, wants us to run weight -wise. By the way, we are going full synthetic because we're pre -mixing. So this motor oil is not going in the fuel. One other benefit of us having deleted the oil metering pump system and not using the engine oil to lubricate the apex seals is that we can get a little extra spicy. And all you need to do. Is this real BP? Just crumble it up and put it in there, man. That's all you gotta do. Couple more of those. I'm mixing them at a three chip per five liters of engine oil and we're good to go. And now for the disclaimer. This was, of course, a gag. Do not put Doritos in your very valuable rotary engine, everybody. It is dyno day and I am here getting ready to drive the FD to the dyno BMS. And look at this. weather. Today's December 6th story has held up, so thankfully just a little bit of wetness, nothing bad. Let's fire this thing up. Let's see if this is going to start right up
00:22:59 Speaker 2
here. Good old FD and... Oh, perfect. There it is. The old smoky smokes.
00:24:19 Speaker 2
Alright, Master Radek, we're having a little bit of an issue with the mid -range, it's sort of grumpy, it's not making a whole bunch of power there, so... We are gapping plugs down to see if that's our issue.
00:24:41 Speaker 2
Well, there we have it. These are our final results. It made almost 370 at the wheel, which is above what we were expecting it to make. Not like, what, 14 pounds? 14 pounds? I would say it's averaging 13 .7, yeah, 13 .7 PSI. That's very healthy. Driving right -hand drive, and oh, my god. Woo -hoo!
00:25:22 Speaker 2
Oh my God, guys. Oh my God, guys. That was a good set, that was a good set.
00:25:34 Speaker 2
You can't help yourself, PT, you just gotta give it a rip. And there it is, arguably one of our best builds to date. This RX -7 was the definition of a turd when it showed up, but man, what a transformation. I'm just so proud of this build and how it turned out. Thanks again for watching everyone, and we'll see you in the next episode.