


Where Your Author's BMW Z4 Requires Water Management
We’re back with a Z4 update today, and it’s an unexpected one. Spring of 2025 saw record rainfall here in southwestern Ohio, and a few weeks ago it rained for five solid days. Factually, the Cincinnati area experienced 7.85 inches of rainfall in April of 2024, compared to its 30-year average of just 4.73 inches. But why should one care about rain if they’ve a watertight hardtop roof?


We’re back with a Z4 update today, and it’s an unexpected one. Spring of 2025 saw record rainfall here in southwestern Ohio, and a few weeks ago it rained for five solid days. Factually, the Cincinnati area experienced 7.85 inches of rainfall in April of 2024, compared to its 30-year average of just 4.73 inches. But why should one care about rain if they’ve a watertight hardtop roof?
The water issue became apparent when washing the car one evening last week, as the windshield gathered some condensation on the inside. I was almost certain there wasn’t a water leak in the passenger compartment, and I’d just treated all the weather seals with Gummi Pflege a couple of weeks prior as part of annual roof maintenance/greasing. The only other explanation was something in the trunk.
Checking out YouTube videos on the topic, there was a new one about E89 water leakage from a man in the UK. He suggested most of the time an E89 was scrapped was down to water leakage in the trunk. Water enters and soaks the battery, radio transmitter, and finally wets and corrodes the hydraulic top equipment. The latter item in particular costs thousands to remedy and is enough to scrap an otherwise functioning Z4.

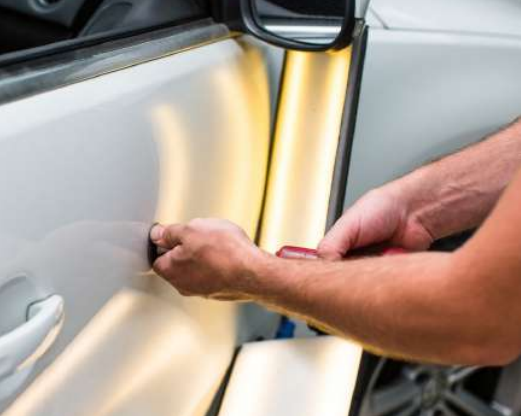
I pulled up the trunk panel to find the top of the battery glistening with condensation. It was sat in a puddle of water about half an inch high. The foam in the area around the hydraulics and other electronics was wet but not fully soaked. Fortunately the water seemed to have accumulated only recently, as the hydraulic pump was not corroded, and the water was clean and not moldy or green. The Shop Vac was called upon to remove the water immediately.
Ready for the nitty-gritty details? The E89’s common trunk water leakage issue stems from the rear lamps. The combination incandescent-LED cluster has to perform many tasks, and water management should really appear on its responsibilities above the rear lighting. Water runs down the seal at the trunk lid and onto the top of the light, and is then routed behind the light itself via an integrated plastic gutter. Then it goes around one of two separate gaskets, and falls down behind the bumper onto the ground below.

Those gaskets are an important part of the water management process. They have an inner and outer lip on them, which seats onto the bodywork in a specific way. If not pulled tight and seated appropriately, water enters the trunk instead of falling outside. Improper placement of the gaskets will lead to debris gathering in the seals, which also routes water into the trunk instead of outside. That’s issue one.
Issue two is with the construction of the light itself, and a change that occurred to the lamp design in 2012. The original lamp design was held together with clips around its exterior that held the gaskets to the body of the lamp. The lamp had three screws around its exterior to hold it to the body. This design sat slightly lower in the bodywork, and its lower edge rested against the bumper.

As the plastic of the lens aged and sat in the water, whenever the bumper was wet condensation eventually seeped through the plastic and into the lower LED portion of the lamp. There is no way to dry this (other than waiting), as the LED section is permanently sealed. Often lamps would fail once the condensation got too heavy and the LED malfunctioned. Early lamps could crack as well, as there was too much tension on the lamp when held in place (three screws).
The new design in 2012 looked identical from the exterior, but the back of the light assembly changed. The new design was held together with clips and screws fixing the gaskets to the body of the lamp. One of the screws for the body was removed, leaving two in total. There were also small foam blocks glued to the bottom of the lamp so it rested slightly higher, and was not sat in water all the time. There was also notably more glue sealing around the perimeter of the lamp from the factory.

Both lamp styles were manufactured by the same company in Italy. It is impossible to tell if a car has a newer or older lamp design unless the light is accessed from the trunk. If it’s a new design lamp, there will be an empty square hole in the bodywork that was previously filled by the third screw.
This hole is in the exact middle of the lamp, and is where the gutters on the gaskets divert the water as it runs behind the lamp. Though the lamp design was changed, filling the hole was never part of the update to the car. So the process went: Replace ruined light with new light design, water now fills the trunk during heavy rain, and ruins the car.

My particular example had both lamp issues outlined above, one at either side. The driver’s side lamp was the original lamp design, manufactured in 2009. It was attached to the body properly but the gaskets were seated improperly. This caused water to enter the left side of the trunk.
On the passenger side I found a much newer lamp, manufactured in June 2016. This lamp was attached to the body properly, and the gaskets were seated properly. However, the hole from the deleted screw was not filled, which meant water entered the trunk at the right side.

Of the two, the left side seemed to be leaking worse and had more debris around the gaskets. Fortunately, the lamps are not terribly difficult to access. Just remove one solid plastic panel covering the trunk hinge, the trunk linking via its plastic rivets, and two (or three) screws to unhook the lamp. Finally there’s a wiring harness that disconnects easily.
From there it was a matter of cleaning the gaskets, applying some additional silicone glue around the exterior edges of the lamps (to prevent the condensation) and plenty of silicone grease in order to seat the gaskets properly to the bodywork. A small rubber washer and some silicone sealant ($10) work nicely to fill the empty hole behind the revised lamp design. Access to the trunk is easiest when the roof is in the “service” position, where the pieces are sandwiched on top of the car and the trunk lid is up and angled toward the rear.

It’s one of those impactful issues you don’t hear about until actually owning the car. I’m sure there are many Z4s driving around with water in their trunks. If a particular example is run in a dry climate or parked indoors (mine was both previously), the water issues may never surface.
A generally easy fix, and a lesson learned: I’ll be monitoring the trunk regularly to ensure the water issues are resolved, as the remainder of May will be fairly rainy. If you happen to be shopping for an E89 Z4 it’s very advisable to lift the trunk panel and check for water. There could be a secret little lake in the back of your BMW.
[Images © Corey Lewis/TTAC.com]
Become a TTAC insider. Get the latest news, features, TTAC takes, and everything else that gets to the truth about cars first by subscribing to our newsletter.


